Unifrost Ice Storage Bin Cleaning Schedule & Maintenance Checklist for Irish Hospitality
Expert guide to cleaning Unifrost ice storage bins for safe, efficient use in Irish hospitality.
Unifrost Ice Storage Bin Cleaning Schedule and Maintenance Checklist (B175, B275AIB, B375)
If you run a bar, hotel, café, or restaurant, your ice bin is a food-contact area. When the cleaning routine slips, you quickly see the commercial impact: off tastes and odours, slime or biofilm, cloudy ice, higher breakdown risk, and awkward questions during an Irish food safety inspection.
This guide gives you a practical Unifrost ice storage bin cleaning schedule for modular bins such as B175, B275AIB, and B375, including what to do end of shift, weekly, and monthly, and what to log so the routine is easy to prove. You will also get the key checks that stop contamination at source when your bin is paired with common Unifrost head units like U165-125 and U230-175.
You will work through the real operator decisions: which tasks are quick enough for service close versus a planned deep clean, which food-safe chemicals and tools are suitable for ice-contact surfaces, the mistakes that damage the bin or leave residue behind, and how to assign responsibilities and record-keeping so the process stays consistent across staff.
Why this routine matters
Ice in a bar or café is a ready-to-eat food. If the storage bin is neglected, it becomes an easy contamination point and can undo otherwise solid hygiene in drinks service. Irish operators are expected to protect ice from contamination because EU Regulation (EC) No 852/2004 requires ice that may contact food to be made, handled and stored under conditions that protect it from contamination.
The practical point is simple: “it looks fine” is not a control measure. Wet, cold surfaces encourage biofilm, and the bin is a high-touch area during busy service.
Ice quality and customer complaints are usually the first warning
Chlorine taste, a musty smell, cloudy cubes, or drinks picking up a fridge-like odour often trace back to the bin rather than the ice maker head. The bin stays damp and cold, and it is repeatedly exposed to hands, scoops, door flaps and general bar dust. Once residue builds, fresh ice can pick up taint as it lands and is handled.
This is especially relevant on modular setups, where a head unit is constantly dropping ice into a separate bin. If the bin is not kept clean, you are effectively “seasoning” every new batch on contact.
Food safety risk is about contact surfaces and handling, not just the water line
Most operators focus on the incoming water supply and forget the last metre. In day-to-day terms, the risk areas are the internal liner, door flap, chute area and the scoop. This is where staff behaviour meets a food-contact surface, and where hygiene slips show up first.
If the bin is not being emptied and sanitised to a written routine, you are relying on best intentions under pressure, which is exactly when shortcuts happen.
Compliance in Ireland is easier when your routine is written, consistent, and provable
If you are ever asked about ice hygiene, the discussion quickly moves from what you think happens to what you can show: cleaning frequency, what chemical is used on food-contact surfaces, who signed it off, and what you do when a clean is missed.
A simple routine also protects you operationally. When an ice complaint lands on a Saturday night, it is a lot easier to make a call when you can point to a recent full empty, wash and sanitise, rather than pulling ice service because nobody is sure when the bin was last properly cleaned.
That is why the checklist below is set up as a realistic end-of-shift routine, backed by deeper scheduled cleans you can keep up with in an Irish bar, hotel, café or restaurant.
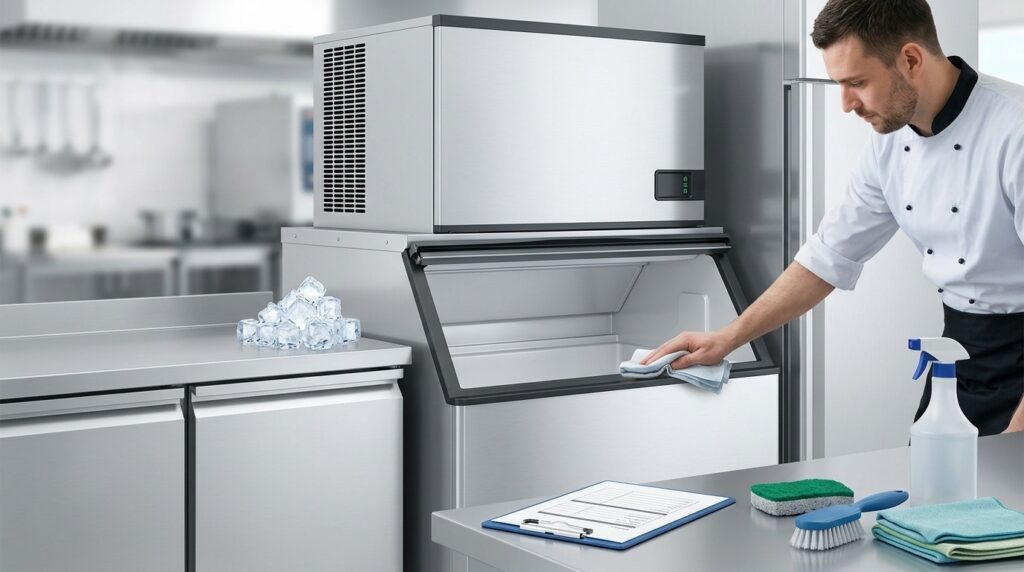
The core cleaning checklist
Empty the bin safely, then wash, rinse, sanitise, and air-dry all ice-contact surfaces before restarting with fresh ice. Build the routine around a quick end-of-shift tidy, a proper weekly clean (including the drain area), and a monthly strip-down of removable parts and seals. Keep the method consistent and logged. In Ireland, an inspection usually comes down to whether cleaning is planned, done, and recorded.
If you ever get slime, mould, or off-odours, treat it as a stop-and-deep-clean job, not a “we’ll do it Monday” problem.
1. Prepare the area and protect service
Do this at the quietest point of the day, typically after last orders or before opening. You need time for surfaces to air-dry properly.
For modular setups (for example, a Unifrost B175 paired with a head unit such as the U165-125 or U230-175), you are cleaning the bin and any head-unit surfaces that can drip or shed debris into stored ice.
Have everything ready before you start:
Clean, food-safe cloths
Non-abrasive brush
Bucket
Cleaner and sanitiser suitable for food-contact surfaces
Avoid grabbing “whatever is in the mop press”. Strong fragrances, aggressive degreasers, and abrasive pads can taint ice and scratch liners. Scratches then become harder to keep hygienic.
2. Empty the bin properly (and stop ice production if it’s a head-unit setup)
Treat any ice in the bin at the start as waste. Bag and dispose of it, or move it to a clearly separate non-food use if that’s part of your site policy. Don’t top up fresh ice on top of old ice. That’s how odours and biofilm keep returning.
If the bin is fed by a head unit, stop ice production first so you’re not fighting a constant refill. Follow the Unifrost instructions for the correct shut-down sequence and any isolation steps.
If the bin has a drain, check it’s flowing freely before you start washing. If it’s slow or blocked, you’ll end up with warm, dirty water sitting in the lowest point of the bin.
3. Wash, rinse, sanitise, then air-dry (don’t skip steps)
Ice is food. Treat the bin as food-contact equipment, not just storage.
Use a structured method like the FSAI “6 stages of effective cleaning”: remove loose debris, clean with detergent, rinse, disinfect or sanitise, rinse if required by the product, then air-dry.
Work top to bottom. Give extra attention to:
Corners and seams
The bin lip
Lid underside
Underside of any baffle
Scoop holder area
If the bin has removable internal parts, take them out and clean separately. It’s faster and you’ll get a better finish than trying to scrub around obstacles.
Practical points that prevent most hygiene issues:
Use warm water for washing. Avoid very hot water that drives steam and condensation inside the bin. Damp surfaces encourage quicker regrowth.
Mix chemicals exactly as the label states and never combine products. Extra concentration is more likely to create taint or damage than better hygiene.
Leave sanitiser on for the contact time on the label. Wiping it off immediately defeats the point.
4. Build a daily, weekly, and monthly routine your staff will stick to
The schedule needs to match how Irish bars, cafés, hotels, and restaurants actually run. A high-volume cocktail bar with constant scoop use will need more frequent attention than a quiet café. After a busy weekend, an extra check can be the difference between clean ice and a Monday problem.
Daily (end of shift): clean the scoop and holder, wipe the bin lip and lid underside, check for splash marks around the top of the bin, confirm the drain is clear, and reject any ice with visible debris or an off-odour.
Weekly (deep clean): fully empty the bin, complete the full wash–rinse–sanitise routine on all accessible internal surfaces, clean around the drain area and any removable baffles, and wipe exterior touch points (handles, lid edges) so staff don’t immediately reintroduce contamination.
Monthly (strip-down and checks): repeat the weekly deep clean, then check lid/door seals, hinges, and plastic components for cracks, staining, or roughness that will hold biofilm. If you have a head unit, line this up with the head unit’s deeper clean so the whole system stays on the same cycle.
If you’re in a hard-water area, the ice machine itself may need a more structured descaling plan. That’s separate to bin cleaning. Descaling targets limescale and performance issues in the ice-making side. Bin cleaning is about hygiene and handling control.
5. Restart correctly and prove it’s clean (taste, smell, and records)
Once everything is air-dry, reassemble carefully. Avoid touching ice-contact surfaces with bare hands.
Restart production and discard the first batch of ice if your chemical label or site procedure calls for it. Ice picks up residual odours quickly, so you’ll know fast if something wasn’t rinsed or dried properly.
For inspections, documentation that matches reality is the easiest win. Keep a written schedule and signed records showing what was cleaned, how often, and by whom. The FSAI highlights cleaning schedules and records as a practical control for food businesses. For new staff, do one clean with them in real time, then have them do the next one while a supervisor checks the finish. In most sites, the gap isn’t knowledge. It’s consistency under pressure.
Chemicals and tools to use
Use three product types and keep it consistent: a food-safe detergent for day-to-day cleaning, an ice-machine cleaner/descaler for scale and mineral build-up, and a food-grade sanitiser that’s suitable for food-contact surfaces. This matters for both hygiene and taste. The Food Safety Authority of Ireland (FSAI) is clear that food-contact surfaces need to be properly cleaned and, where appropriate, disinfected using suitable products as part of your hygiene controls. “Stronger” is not “safer” in an ice bin. Use chemicals that are approved for food-contact use, suitable for ice equipment, and rinse where the label requires it.
Stick to the same three chemical categories (and follow the label and the manual)
Unifrost cleaning guidance typically refers to categories rather than a specific brand:
Detergent: removes soil and grease.
Ice-machine cleaner/descaler: removes limescale and mineral deposits.
Sanitiser: applied after cleaning to reduce remaining microbes.
If you’re building an SOP for Unifrost pairings (for example head units and storage bins), keep the chemical list short and repeatable. Staff should be able to follow it reliably during close, without guessing what’s in an unlabelled bottle.
What “safe for ice-contact surfaces” means in practice in Ireland
In an Irish hospitality setting, “safe” needs to cover food safety, equipment compatibility, and routine handling. In practice, that means:
Food-contact suitability you can evidence: keep the product label and Safety Data Sheet (SDS) accessible.
Low taint risk: avoid products that leave fragrance or residue that can carry into ice.
Materials compatibility: ice machines include plastics, seals, and metal components. Use ice-machine-specific cleaners/descalers rather than generic descalers aimed at kettles, bathrooms, or heavy-duty wash-down.
A simple SOP flow that aligns with FSAI hygiene principles is:
Clean with detergent
Descale where needed
Sanitise
Cleaning first matters because disinfectants do not work properly on dirty surfaces. (See FSAI Guide to Good Hygiene Practice for the Catering Sector: https://www.fsai.ie/publications/guide-to-good-hygiene-practice-for-the-catering-sector)
The chemicals: what to keep on your cleaning shelf (and what to keep away)
Avoid “kitchen sink chemistry”: don’t mix chemicals, and don’t assume household bleach is automatically suitable for internal ice-contact components. One rule that works on busy sites: only use products intended for food-contact surfaces and ice equipment, and only at the manufacturer’s dilution.
Tools that reduce contamination risk (and save labour)
You don’t need specialist kit, but you do need dedicated tools used only for the ice machine and bin. Shared cloths and brushes are a common route for taint and cross-contamination.
Keep a small, labelled set:
Dedicated scoop, stored outside the ice
Non-abrasive cloths/pads (non-shedding)
Detail brush for corners and the drain area
Clearly labelled spray bottle for sanitiser at the correct dilution
In busy bars and hotels, a second scoop in rotation is a simple way to keep service moving while one is being washed and sanitised.
A practical compliance note for inspections and audits
Inspectors usually care less about the brand name and more about whether you have consistent control: correct chemical, correct dilution, correct contact time, and evidence the routine happens. The most “inspection-ready” approach is to:
keep the label/SDS available,
standardise on the same two or three products,
and train staff to follow the same sequence every time,
which fits the documented cleaning controls expected under FSAI catering hygiene guidance: https://www.fsai.ie/publications/guide-to-good-hygiene-practice-for-the-catering-sector
Once the chemical shelf and tools are standardised, cleaning becomes a reliable close-down job, not a monthly rescue mission.
Mistakes to avoid
Treating the ice storage bin as “just a box under the head” is where most problems start. If cleaning slips, you will get biofilm, odours and residue that can taint ice and create an easy win for an inspection. Ice is a food, so ice-contact surfaces must be cleaned and, where necessary, disinfected often enough to prevent contamination under EU hygiene rules (Regulation (EC) No 852/2004, Annex II).
In Irish bars and hotels, you usually feel the pain operationally first: slower ice draw, wet slushy corners, staff avoiding the bin, then complaints. Calling it a “food safety incident” tends to come later.
The common bin-cleaning mistakes that cause the most trouble
Only doing a deep clean when you can smell it: If you skip a simple empty-and-wipe routine, residue turns into biofilm and becomes harder to remove. That is exactly why food-contact equipment must be cleaned and disinfected often enough to prevent contamination (see Annex II, Chapter V of Regulation (EC) No 852/2004).
Using the wrong chemical, or mixing it too strong “to be safe”: You can leave a chemical taint if rinsing is rushed. Strong mixes also shorten the life of plastics, seals and finishes when staff grab whatever is on the cleaning trolley.
Cleaning the bin but ignoring the handling points: Scoops, scoop holders, the chute area and the underside of the lid are common re-contamination routes. Inspectors look at how ice is actually handled, not just whether a schedule exists on paper.
“Topping up” and mixing old ice with new: Any stale ice and meltwater left in corners will drag odours and residue straight back into the fresh batch. Ice needs to be handled and stored to protect it from contamination (see Annex II, Chapter VII, point 4 on ice handling and storage).
Not isolating and draining properly before a deep clean: If you leave standing water, you dilute sanitiser and end up rushing the restart. A bin left damp and warm in a busy bar will turn again quickly.
Poor placement that encourages sweating and a wet lid: Condensation around hinges and edges attracts dust and mould and turns the outside of the bin into another constant cleaning job in a warm service area.
What damages the bin, not just hygiene
Abrasive pads and metal scrapers are a quiet killer. They leave fine scratches that hold dirt, so the bin never looks properly clean and each clean takes longer.
What operators miss during service
The quickest way to undo your cleaning routine is poor scooping under pressure: storing the scoop in the ice, handling it with bare hands, or using glassware as a scoop when you are short-staffed. Even with a well-performing machine, the bin becomes the contamination point.
Build the basics into your checklist: a dedicated scoop, a clean holder, and one simple rule that ice is treated like ready-to-eat food. That is how you get from “we do it when we can” to something you can keep up on a Saturday night.
Integration into daily operations
Integrate ice bin cleaning by building it into the parts of the day that already happen: a quick close-down routine that never gets skipped, a planned weekly clean that needs the bin emptied, and a booked deep clean when the machine and bin can be taken out of service. Give each task a named owner by shift, with one manager sign-off, so it does not drift into “everyone’s job” and therefore nobody’s job. Keep the log beside the unit and file it with your HACCP records.
If you are regularly missing the planned clean, treat it as a workflow or capacity problem (no clean window, not enough ice cover, wrong location), not a staff motivation problem.
1. Set a “service-safe” routine your team can finish every time
Most sites do better with two levels of cleaning:
Shift-close hygiene (minutes): wipe the lid and handle, clean the scoop and holder, and wipe the top lip and splash zone inside the bin.
Scheduled clean (needs the bin empty): a proper wash and sanitise of the internal surfaces, with checks before restart.
Tie the shift-close task to a fixed moment that already exists, such as last call, bar close-down, or the end-of-shift kitchen checks. Avoid “before you go” as a instruction. It is vague, and it gets missed when the night runs late.
If you trade late, put the routine on the day shift close-down instead. A missed clean at 2am has a habit of becoming a missed clean all week.
2. Assign roles by station, not by job title
Ice hygiene fails when responsibility is vague. Make it station-based and visible:
The station using the ice owns the shift-close wipe-down and scoop hygiene.
One trained person (supervisor, KP, duty manager, depending on your operation) owns the weekly empty-and-clean and the restart checks.
One manager signs off the record.
This is especially important in mixed-use setups where bar and kitchen both pull from the same bin. Even if the bin sits behind the bar, the kitchen should not be “borrowing” the task along with the ice.
3. Protect trading by planning an “ice run-down” window
Weekly and deep cleans fail when the bin is still half full and service is still pulling ice. The practical fix is to plan an ice run-down window:
Let the bin run low on purpose.
Switch to a backup ice source for a defined period.
Empty, clean, sanitise, dry, and restart properly.
In a hotel, that window is often mid-morning between breakfast and lunch. In many pubs, a quieter weekday afternoon is more realistic.
If your setup is a separate head unit and storage bin, plan and clean them as one system. You do not want to sanitise the bin and then drop fresh ice through a dirty chute area, or clean the machine and then store ice in a bin that has not been sanitised.
4. Keep records simple, local, and inspection-ready
EHOs are typically looking for evidence of control: a routine, staff who understand it, and records that match reality.
Keep a one-page log beside the unit with:
Date and time
Which unit (machine and bin, if separate)
Task level (shift-close, weekly clean, deep clean)
Who did it (initials)
Manager check/sign-off
In Ireland, procedures and records sit within the HACCP-based approach required of food businesses under Regulation (EC) No. 852/2004 and related guidance. Use these as your baseline references for hygiene controls and documentation:
FSAI guidance on Regulation (EC) No. 852/2004 and hygiene of foodstuffs
FSAI Guide to Good Hygiene Practice
Treat ice as a food product in your HACCP thinking. That means handling controls matter as much as cleaning frequency.
5. Build “no-contamination” habits into service
If staff are dipping glasses into the bin, storing the scoop in the ice, or handling ice with bare hands, you will be cleaning constantly and still getting contamination.
Set non-negotiables that match service pressure:
Dedicated scoop
Scoop stored outside the ice in a clean holder
No glass in the bin
No cross-use scoops (do not share with flour, sugar, seasoning, etc.)
Training does not need to be a seminar. A 60-second briefing for new starters, plus a simple reminder inside the lid, usually does more than a long SOP nobody reads.
If you get recurring off-odours, sticky residue, or visible slime or mould, treat it as stop-and-clean now, not “get through tonight”.
6. Align bin cleaning with descaling and water management
Do not split “bin cleaning” from “machine maintenance” on the calendar. That is how you end up with a clean-looking bin holding poor-quality ice.
Coordinate:
Weekly/deep cleans with the machine’s cleaning and descaling routine
Filter changes on the same schedule so they do not get forgotten
Hard water areas will generally need tighter intervals because limescale builds faster and can affect both performance and hygiene. Use Unifrost guidance where provided as your baseline, then tighten the schedule if your site has higher volume, warmer ambient conditions, or more airborne grease and dust than normal.
When you are ready to turn this into something staff can follow without guessing, a task-by-task checklist is the next step.
Connecting with Unifrost’s wider support
A cleaning schedule is not just a hygiene box-tick. It is one of the simplest ways to protect the working life of your ice machine and storage bin. Most problems show up when the basics slip: routine wipe-downs get missed, then scale, biofilm and drain smells build up quietly until you are forced into a call-out.
How often you need to clean still depends on service volume, water quality and how the bin is used. The “best” schedule is the one your team can actually carry out and record, every week.
Why regular bin and machine maintenance saves money (not just hassle)
With modular setups, you are relying on clean ice-contact surfaces, clear drains and predictable meltwater handling. When bins are not emptied and sanitised often enough, you tend to see the same issues:
Off-odours that carry into drinks
Slimy build-up around doors, chutes and seams
Slow draining and standing water
“Mysterious” ice quality complaints from staff and customers
Commercially, maintenance reduces three expensive outcomes: call-outs during peak trading, wasted ice and time when stock has to be dumped mid-shift, and premature wear caused by scale or restricted water flow.
It also helps at inspection time. A documented routine makes it easier to show control of cleaning and disinfection, which is the expectation under HACCP-based food safety management. The FSAI summarises HACCP as the basis for identifying and controlling food safety hazards in catering in its HACCP guidance for food businesses.
Use Unifrost’s support content to build a schedule you will actually follow
Unifrost publishes baseline cleaning guidance in its FAQ, including “Unifrost Ice Machine and Storage Bin: Cleaning and Maintenance Schedule” and “How often should I clean and sanitise my ice machine and storage bin?”. Treat that as your minimum standard, then adjust for site reality, for example:
Busy cocktail service and constant bin opening
High ambient temperature behind the bar
Hard water areas that drive more frequent descaling
Staff using the bin heavily during service rather than treating it as closed storage
If you want to tailor the routine to your own setup, do not guess chemical strength, contact time, or which parts can be removed. Follow Unifrost’s guidance first, then add site-specific steps that do not conflict with the manufacturer’s process, such as an end-of-shift “scoop, wipe, lid closed” routine for bar staff.
What “support” looks like in the real world for an Irish operator
Under service pressure, the support that matters most is what prevents downtime. In practice, you want four things ready before you need them:
The cleaning schedule and any relevant manuals printed for your HACCP folder and staff training
Clear guidance on which chemicals are suitable for ice-contact surfaces, and what will damage plastics, seals or internal components
A repeatable isolation, emptying, restart and “back in service” routine, so deep-cleaning is not guesswork
A route to parts and service support when cleaning does not solve the issue, especially for persistent odour, poor ice production or repeat drain problems
When your bin routine is consistent, troubleshooting is quicker. You are less likely to waste time chasing a hygiene issue that is presenting like a refrigeration fault.
Knowing when to stop cleaning and start troubleshooting
Cleaning fixes a lot, but not everything. If symptoms return soon after a proper empty, clean and sanitise, treat it as a troubleshooting job rather than “just clean it again”. Common triggers include:
Persistent cloudy or soft ice
Odours that return within days
Standing water in the bin
Slow meltwater draining or frequent backing up
Visible slime returning around seams and door edges
From a food safety point of view, visible contamination is a stop-and-reset moment. Ice is treated the same as food for contamination control, and should be managed under your normal cleaning and disinfection controls. The FSAI sets out expectations on preventing contamination in its food safety guidance for food service businesses.
Operationally, it is also a prompt to look upstream at causes cleaning will not fix on its own, such as filtration condition, drain routing, or a machine running in a hot, poorly ventilated corner.
Making your cleaning log inspection-ready without turning it into paperwork theatre
A good log is short, consistent and signed. The point is not the spreadsheet. It is to show you have a routine, it is being followed, and you take corrective action when it is not.
Keep records in a simple HACCP-friendly format: what was done, when, by who, verified by, and what corrective action was taken. File it with the rest of your food safety management documentation, in line with the approach the FSAI promotes in its HACCP-based guidance. Once the support documents and record structure are in place, the day-to-day cleaning becomes easier to standardise across staff and shifts.
FAQs: Unifrost ice storage bin cleaning schedule
How often should I clean and sanitise a commercial ice machine and its storage bin?
For Irish hospitality, a practical baseline is:
Ice contact points: every day (or every shift in busy bars): wipe down the bin door, handle, chute/deflector, scoop, and scoop holder.
Bin emptied, washed, and sanitised: weekly in typical service.
Full machine and bin deep clean: every 3 to 6 months (more often if you have hard water, heavy usage, or any off-odour).
Move to an immediate clean if you see slime/biofilm, mould spotting, musty odours, cloudy ice, or debris in the bin, or after any contamination event (glass breakage, flood, pest control treatment, etc.). Always follow the model-specific Unifrost instructions where available.
What cleaning and sanitising steps are needed inside the ice machine and bin?
Use a repeatable, inspection-friendly workflow that separates cleaning (soil removal) from sanitising (germ reduction).
Plan downtime: allow enough time for the bin to be emptied and air-dried.
Isolate safely: turn the unit off and isolate power as per site procedure. Shut off water if you are cleaning internal water circuits.
Empty the bin: discard all ice. Do not “top up” fresh ice on old ice.
Remove loose parts you can safely access (for example baffles/deflectors, scoop holder, curtains). Wash separately.
Wash bin interior: using warm water and a food-safe detergent, scrub all ice-contact surfaces, corners, and the underside of the lid/door.
Drain and rinse: clear the bin drain area so dirty water does not sit in the base. Rinse thoroughly with clean water.
Sanitise: apply a food-safe sanitiser at the correct dilution and contact time to all ice-contact surfaces. Do not mix chemicals.
Air-dry: allow surfaces to air-dry where the sanitiser requires it. Avoid towel-drying with cloths that can reintroduce bacteria.
Reassemble and restart: refit parts, restore water and power, then run the unit.
First ice check: once producing normally, inspect ice quality and odour. If taint remains, repeat and review chemical dilution, contact time, and drain hygiene.
If you are also cleaning inside the head unit, follow Unifrost’s model guidance for cleaning/descaling cycles and which panels/components are intended to be removed by staff versus a technician.
What cleaners and sanitisers are safe and food-safe for ice-contact surfaces?
Use only food-grade products that are labelled for use on food-contact surfaces and suitable for plastics and stainless steel typically found in ice bins.
For cleaning (degreasing/soil removal): a mild, food-safe detergent. Avoid strong perfumed cleaners that can leave odours.
For sanitising: a no-rinse (where permitted by the label) food-contact sanitiser used at the manufacturer’s dilution and contact time.
Avoid these common causes of damage or taint:
Bleach used incorrectly (too strong, wrong contact time, not rinsed when required).
Abrasives (scourers, powders) that scratch surfaces and make biofilm harder to remove.
Mixing chemicals (for example acids with chlorine products), which can create hazardous fumes.
If you want a model-specific “approved chemicals” list for your Unifrost setup, contact Unifrost support with your machine head model and bin model (for example U165-125 + B175 or U230-175 + B275AIB).
Next step: get the printable checklist or model-specific support
If you want this routine to be easier for staff to follow and easier to prove during inspections, download the printable ice storage bin cleaning checklist and keep it with your HACCP records.
Need a model-specific cleaning routine for your Unifrost head unit and modular bin combination (for example B175, B275AIB, B375 paired with U165-125 or U230-175)? Contact Unifrost support with your model details and usage pattern, and we will point you to the correct steps and files.
Keep comparing inside the same Unifrost topic
These articles are the best next reads if the visitor wants a deeper product choice, maintenance, or support route from here.
Unifrost Upright Freezer Temperature Controller Deep Dive Owner Hub
Explore Unifrost upright freezer controllers for optimal settings and food safety in Irish kitchens.
Read guide
Unifrost F410SS Upright Freezer Shelf and GN Pan Setup Guide for New Owners
Guide Irish kitchens in setting up and using shelves, GN pans, and baskets in the Unifrost F410SS upright freezer efficiently.
Read guide
Unifrost F410SS Upright Freezer Upgrade or Replacement Guide
Explore when to replace or upgrade your Unifrost F410SS upright freezer for optimal performance in Irish kitchens.
Read guideView Unifrost bottle coolers at Caterboss
The article stays useful on its own, but when the reader is ready to compare real products or move into a commercial conversation, this is the clean next step.